Keep Teaching Step-by-Step for Synchronous Delivery
Keep Teaching Step-by-Step for Synchronous Delivery (PDF version)
In these challenging times we have had to come together quickly to do our best for students. This guide will help you transition to synchronous delivery of your courses.
Step 1: Decide on your method of instruction
Decide on one of the following and inform Extended Learning of your decision:
- I plan to teach all my on-campus courses synchronously via Zoom (live session during scheduled class time).
- I plan to teach SOME of my on-campus courses synchronously via Zoom. If this option is selected, please provide name of class and meeting time.
- I plan to teach all my on-campus courses asynchronously as an online course in Blackboard with no required meeting times
- Other. Please explain.
Most of you have already done this. If not, please do so as soon as possible.
Also consider whether you would like to use Zoom for office hours. If so, review the Guide for Virtual Office Hours.
Step 2: Communicate with students
Students who have not learned online before are likely very nervous and would appreciate hearing from you as soon as possible. Communication will be key for helping students get through this challenging time. Here are a few suggestions:
- Send an announcement to your students as soon as you have decided on your plans for moving forward.
- Explain your expectations of them in the class being held via Zoom
- Inform students of your expectations for attendance and participation
- Inform students of the best way to contact you and what they can expect from you regarding your response time. Be prepared for a lot of questions.
- Explain how the class will operate under the period of instructional modification.
- Encourage students to test drive Zoom and get help if there are any issues.
Step 3: Schedule your Zoom meetings
Create a Zoom account and install the desktop application. Use the Zoom Installation Guide for MSU then contact Extended Learning if you still have questions.
In Zoom, schedule your class meetings. Zoom only allows users to host one meeting at a time, therefore, you must schedule your own meetings. Please consult the Quick Start Guide for Faculty for instructions on how to do this.
Virtual Office Hours
If you plan to only use Zoom for office hours, please review the Virtual Office Hours Guide. The approach to setting up meetings is different than that used for classes.
Step 4: Send your Meeting IDs to Extended Learning
A schedule of all classes with the staff members who will be your moderators in Zoom will be sent to you shortly. Please respond as soon as possible with the meeting IDs for the meetings you scheduled in Zoom.
Also indicate where you intend to conduct the Zoom meeting (on campus or from home). If you will be on campus, your Zoom support person may be able to join you in person to help you get started.
Provide a phone number for the support person to reach you if needed.
Step 5: Assess and Plan
Course Information
Review your course to determine priorities. Set realistic goals for continuing instruction. What activities that you already have planned lend themselves well to the delivery mode you have chosen? What do you expect students to accomplish during the disruption? See the Designing a Hybrid Course worksheet below for ideas.
See the section called Add Zoom Section to Course in the Quick Start Guide for Faculty for suggestions and examples of how to inform students about Zoom and how to use it.
Update your syllabus with information that has changed. Consider policies, due dates and assignments. Will you require students to use the camera during class? Read the Strategies for Teaching with Zoom document for more ideas and options to consider.
Course Design
If you do not normally teach online, you may be feeling a little overwhelmed. Re-designing courses from one delivery mode is not an easy or simple task. Don’t worry! Just take it one step at a time. These questions and the worksheet below will help you rapidly re-design your courses for the duration of the disruption.
- What learning outcomes still need to be addressed?
- What activities already planned lend themselves well to remote synchronous delivery?
- In what ways are my courses already structured to support remote learning?
- What assignments and activities should I keep, and which can I modify or cut, if any?
- What instructional technologies should I consider that I am not using now?
- What can I maintain in my original syllabus and class schedule? What do I need to change?
- How many students are in the class and how will that affect my choices?
- Can I make remaining course work optional?
- Should there be an alternative timeline for exams (e.g., If I typically give 2 exams per semester, should I give 3 exams and drop the lowest grade)?
- Will changes need to be made in the grading structure?
Course Development Questions
Now that you have considered the important points of course re-design, consider what needs to be developed.
- What course materials do I need to create?
- Do my course materials need to be tweaked for the remote environment?
- What support do I need to develop (or further develop) my courses in Blackboard?
- What pre-existing resources can I use?
- What is the best way to deliver this content?
- What can I realistically accomplish?
Logistics to Consider
When delivering instruction in a new environment, logistics are different from what you are accustomed to. These questions help you consider important aspects of remote learning:
- Will I require proctoring for exams? If so, what level of security will I require? What tool will I need to achieve that level? (Consider ProctorU and YuJa Proctoring)
- Will I require students to continue to meet during every class session or should I reduce their “seat time”?
- How will I support students who get sick and cannot meet expectations?
- How will I handle it if I require Zoom attendance and students cannot get online or have technical difficulties?
- Am I willing to record my Zoom sessions for students that could not be there?
- Am I prepared to give incompletes if student illness justifies it?
Designing for Transition
When transitioning an on-campus or online course to a hybrid design, ask yourself how each activity is best presented for your students.
Current Class Activities |
Synchronous (Zoom) |
Asynchronous (Blackboard) |
|
Quizzes and Exams |
|
Blackboard |
|
Participation
|
Zoom |
Discussion done in Blackboard on discussion forums |
|
Attendance |
Roll call |
|
|
Group Project |
Work together and present together on Zoom |
Record group presentations using Zoom |
|
Gallery/Studio visits and reactions |
Small group sharing in Zoom |
VoiceThread Discussion Forums |
|
Study Guides
|
|
Assignment drop boxes Ungraded or low stakes quizzes |
Step 5: Transition to Remote Instruction
Start the transition with adding class information to Blackboard, if it does not already exist.
Add your contact information.
- Using the Announcements tool, create a welcoming message to students that explains the situation and tells them what to expect. Announcements remain in the course under the announcement tool.
- Remember to have the announcement sent to the email inboxes of your students. In Bb you do this by checking the box to Send a copy of this announcement immediately.

Example of Welcome Announcement
To help you continue with the semester successfully, this course has been moved to a hybrid format. I will post announcements and send emails as the need arises to keep you informed. Please login to this course and check your MSU email accounts daily.
Add already existing materials, including:
- PowerPoint slides
- Course handouts and Test review materials
- Videos you normally show in class
Re-work materials and activities for optimal delivery in the remote environment:
- Attendance/roll call can become a way to get to know each other better by asking questions about the weather, their food preferences, favorite sports, and other conversation starters.
- In-person group projects can be done by meeting outside of class in Zoom meetings or in breakout rooms during class.
- Muddiest points can be identified using red and green cards or “fist to five” gestures that indicate level of understanding.
- See the Strategies for Teaching with Zoom document for more ideas.
Use the Grade Center:
- Enter students’ existing grades by adding external grade columns to the Grade Center for each item.
- Items that are added in Bb (like assignments and quizzes) will automatically generate a column for grading.
- If you are grading items that are not provided via a Bb feature, and are not integrated with Bb, will require a manually created column.
Be present.
- Make sure your own camera is always on during class so that students can see you and get to know you. As you know, relationships make all the difference for some students.
- Model appropriate behavior in a remote learning environment
- Contribute to student discussions via chat or in breakout rooms.
Step 6: Prepare for Success
If you have not used Zoom before, take some time to get to know the program before classes resume. Jump right in and give it a try. Chris Gonnella and Alissa Perkins from Extended Learning are available during business hours from 8:30 am to 4:30 pm for test runs. Other faculty using Zoom may also be available to help test.
Prepare a space in your home where you can comfortably hold your classes and turn on your camera. Check out the Virtual Background feature in Zoom for a little fun.
Check your internet speed and make sure it can support Zoom traffic. For group calling, you should have at least 3 Mbps for upload and download speed. To see both on the Fast.com site, click the Show More Info button.

Consider plugging directly into your router using an Ethernet cable to maintain a reliable internet connection. If you need assistance with checking your internet speed or with obtaining an Ethernet cable, contact Matt Dalrymple from Information Technology Services.
Keep it Simple. If you are new to Zoom, stick with the basics. Wait until you are comfortable using audio, video and screen share before thinking about using breakout rooms or the whiteboard, for example.
Review the Troubleshooting Zoom document. Although your moderator will do most of the troubleshooting for you, it is wise to go into the meeting with some understanding of how to handle common problems.
Consult with your Zoom moderator to make sure schedules are aligned. Get started on the same page by discussing how you would like to communicate during class if anything needs to be said.
Step 7: Remote Classroom Management
First and foremost, be patient with yourself and your students. We are all in this together!
When possible, arrive at least 30 minutes early to each class, especially on Monday.
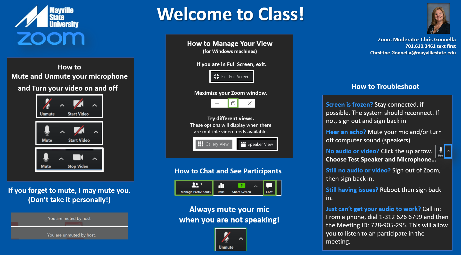
Test your equipment and practice sharing your screen by posting the provided “splash screen” so that students see it upon entering the meeting. Remember to change the Zoom moderator’s contact information and photo. Feel free to change whatever else you wish on the slide.
Welcome your students as they enter the meeting. This builds relationships and helps students test their audio.
Start class on time even if some students are having technical issues. Your moderator is there to help them so use your time to teach your class.
Moderators will be quite busy the first few days, so be patient with them, as well. If possible, spend a few minutes introducing your moderator and orienting students to Zoom. You or your moderator could provide a brief tour of Zoom and review what is on the splash screen.
Discuss etiquette and expectations during the first class and revisit them throughout the duration of the course as needed.
Occasionally remind students to mute their mics when they are not speaking. You may also need to remind them to turn on their video – many students would prefer to hide behind their profile picture. One of the advantages of using a tool like Zoom is that you can see the faces of your students. This is not helpful if students do not turn on their cameras.
Be mindful of academic supports that students may need due to school closure. Some students may need academic support that they didn’t have before because of transitioning to online and/or remote learning. If you have questions about academic support in general or concerns about specific students, contact Katie Richards.
Review the Strategies for Teaching with Zoom document for more for suggestions on how to engage students in a remote, synchronous environment.
Have fun! Zoom can be a powerful tool for interacting with and engaging students!
Step 8: Stay in touch with your Division
Stay in close touch with your colleague, your division chair and with your moderator. Reach out to others when you have questions; we are all in this together!